Embedding HIViews in Qt/Mac Applications
Unlike earlier Qt versions, Qt 4 for Mac OS X is built on the top of the HIToolbox APIs which form Apple's modern Carbon interface. This means that Qt can interact with other HIToolBox APIs for extra functionality. We'll take a look at this by showing how to embed HIViews inside a Qt application.
When Qt was originally introduced on Mac OS X, a Qt window consisted of a window with regions for various areas of the widgets. While this allowed us to do quite a bit with our widgets, it made it very difficult to integrate Qt widgets with other applications or vice versa. Typically, one worked around this by using separate windows or by possessing intimate knowledge of how Qt dealt with widgets, but this was hardly optimal.
We wanted to remove this limitation in Qt 4, so we jumped onto the HIView bandwagon. This was Apple's new way of creating their own widgets in the Carbon world. This meant that every QWidget was now a HIView and could be manipulated and used just like other HIViews. This also gave us the benefit of compositing without any extra work on our part.
Still, it was not all perfect. You could now embed Qt widgets in other non-Qt windows and vice versa, but it wasn't straightforward. It still required knowledge about how Qt deals with events and some custom code to set it up. It was certainly possible, but more work than you would typically expect when using Qt.
For Qt 4.2, dropping support for Mac OS X 10.2 suddenly allowed us to put QWidgets inside menus. Since we were working on putting Qt widgets in non-Qt windows, we decided to go a bit further and make it easy for anyone to add a HIView into a QWidget.
With Qt 4.2, it is easier than ever to embed other Carbon HIViews (hereafter referred to as just "views") in Qt.
Getting Started
In general, adding a standard view to a Qt widget hierarchy basically involves the following steps:
- Wrap the view into a QWidget subclass.
- In the constructor, create your view and pass the HIViewRef to the protected QWidget::create() function.
- Wrap any additional functions that map into Qt concepts.
- Wrap any other view-specific functionality depending on how much you want it to interact with other widgets.
Steps 3 and 4 are optional. With a little effort, you can make a custom view act very much like a Qt widget, complete with properties, signals and slots. If all you need to do is "just get the thing in there", you can stop at step 2.
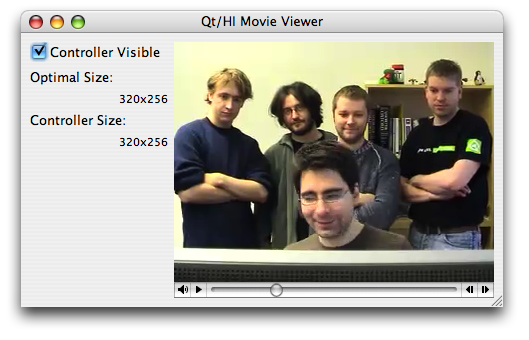
Using HIMovieView
It makes most sense to embed something that is a bit different to a standard Qt widget. So, let's take a HIMovieView and add it to a Qt window.
HIMovieView is a new view in Mac OS X 10.4 (Tiger) or QuickTime 7 and it lets you play QuickTime content. In previous versions of Mac OS X, there was the older "Movie Control", but HIMovieView adds simplicity and performance at the price of only being available on systems with QuickTime 7. Unfortunately, it will only be a 32-bit option on future versions of Mac OS X.
Regardless, it's still a great view for illustrating how to embed views in Qt without complicating the example unnecessarily. Here's the class declaration:
class MovieWidget : public QWidget
{
    Q_OBJECT
    Q_PROPERTY(bool nativeControlsVisible
               READ nativeControlsVisible
               WRITE setNativeControlsVisible)

public:
    MovieWidget(QWidget *parent = 0);
    ~MovieWidget();

    bool nativeControlsVisible() const;
    void setNativeControlsVisible(bool visible);

    QSize sizeHint() const;

signals:
    void optimalSizeChanged();

public slots:
    void loadMovie(const QString &fileName);

private:
    Movie currentMovie;
};
Our movie widget isn't too different than most widgets. We have a property indicating whether or not we want to have the native QuickTime controls. We implement sizeHint() because movies generally have a certain size they want to be shown in. We also provide a signal so that a window can catch any such change, and we've provided a loadMovie() slot.
MovieWidget::MovieWidget(QWidget *parent)
    : QWidget(parent),
      currentMovie(0)
{
    HIViewRef movieView;

    HIObjectCreate(kHIMovieViewClassID, 0,
            reinterpret_cast<HIObjectRef *>(&movieView));

    HIMovieViewChangeAttributes(movieView,
            kHIMovieViewAutoIdlingAttribute
            | kHIMovieViewControllerVisibleAttribute, 0);

    create(WId(movieView));

    setSizePolicy(QSizePolicy::MinimumExpanding,
                  QSizePolicy::MinimumExpanding);
}
Our constructor creates an instance of HIMovieView and sets its attributes. You may wonder why we do this with the rather generic HIObjectCreate() and not the documented HIMovieViewCreate() function. This is to work around a bug in QuickTime 7.0. For later versions of QuickTime, we could use HIMovieViewCreate().
After we have done that, we call the QWidget::create() function, which will set the HIViewRef as this QWidget's window ID. From here, we can always get back the HIViewRef by calling winId() and casting it.
Since movies have a minimum size and look fine when expanded, we adjust our size policy accordingly.
MovieWidget::~MovieWidget()
{
  if (currentMovie != 0)
        DisposeMovie(currentMovie);
}
Our destructor cleans up the current movie &emdash; leaking movies can be expensive.
bool MovieWidget::nativeControlsVisible() const
{
    OptionBits currentBits = HIMovieViewGetAttributes(
        HIViewRef(winId()));
    return kHIMovieViewControllerVisibleAttribute &
           currentBits;
}

void MovieWidget::setNativeControlsVisible(bool visible)
{
    if (visible != nativeControlsVisible()) {
        HIMovieViewChangeAttributes(HIViewRef(winId()),
          visible ?
            kHIMovieViewControllerVisibleAttribute : 0,
          !visible ?
            kHIMovieViewControllerVisibleAttribute : 0);
        updateGeometry();
        emit optimalSizeChanged();
    }
}
Our native controls property simply passes values through to the HIMovieView API, insulating us from the more clumsy "change attributes" pattern.
Because changing the visibility of the control changes its size, we need to update our geometry and emit a signal to indicate that it has changed, so others can take this into account.
The loadMovie() slot may look complex, but it is primarily set up for QuickTime. Since QuickTime has its own documentation, we'll gloss over most of the details.
void MovieWidget::loadMovie(const QString &fileName)
{
    QTVisualContextRef visualContext = 0;
    Boolean active = true;
    DataReferenceRecord dataRef;
    Movie oldMovie = 0;

    QTNewMoviePropertyElement newMovieProperties[] = {
        { kQTPropertyClass_DataLocation,
          kQTDataLocationPropertyID_DataReference,
          sizeof(dataRef), &dataRef, 0 },
        { kQTPropertyClass_NewMovieProperty,
          kQTNewMoviePropertyID_Active,
          sizeof(active), &active, 0 },
        { kQTPropertyClass_Context,
          kQTContextPropertyID_VisualContext,
          sizeof(visualContext), &visualContext, 0 }
    };

    CFStringRef cfString = CFStringCreateWithCharacters(0,
            reinterpret_cast<const UniChar *>(
                fileName.unicode()), fileName.length());
    QTNewDataReferenceFromFullPathCFString(cfString,
            kQTPOSIXPathStyle, 0, &dataRef.dataRef,
            &dataRef.dataRefType);
    CFRelease(cfString);
The key point is that we first need to create a QuickTime reference to the file. We do this by converting our QString to a Core Foundation string (CFStringRef). Since each CFStringRef is reference-counted, we need to remove our reference to it when we are done with it by calling CFRelease().
We replace the old Movie with a newly-created one and perform all the necessary housekeeping to keep QuickTime happy, then we use the HIMovieViewSetMovie() function to embed the Movie into our widget:
oldMovie = currentMovie; currentMovie = 0; NewMovieFromProperties(sizeof(newMovieProperties) / sizeof(newMovieProperties[0]), newMovieProperties, 0, 0, ¤tMovie); DisposeHandle(dataRef.dataRef); HIMovieViewSetMovie(HIViewRef(winId()), currentMovie); if (oldMovie != 0) DisposeMovie(oldMovie); updateGeometry(); emit optimalSizeChanged(); }
Before we return, we call updateGeometry(), emitting our custom optimalSizeChanged() signal to indicate that the size has changed.
QSize MovieWidget::sizeHint() const
{
    EventRef event;
    HIRect optimalBounds;
    CreateEvent(0, kEventClassControl,
        kEventControlGetOptimalBounds,
        GetCurrentEventTime(),
        kEventAttributeUserEvent, &event);

    SendEventToEventTargetWithOptions(event,
        HIObjectGetEventTarget(HIObjectRef(winId())),
        kEventTargetDontPropagate);

    GetEventParameter(event,
        kEventParamControlOptimalBounds, typeHIRect,
        0, sizeof(HIRect), 0, &optimalBounds);

    ReleaseEvent(event);
    return QSize(optimalBounds.size.width,
                 optimalBounds.size.height);
}
The HIMovieView implements a Carbon event called kEventControlGetOptimalBounds that we can use for calculating the sizeHint(). Since Carbon does not have such things as virtual functions, we follow the Carbon pattern of sending the event and getting the information back which is returned in an HIRect. We can then return the new optimal size. Now that we've created our HIMovieView, we can put it into a widget hierarchy, make QObject connections and do other things that you would expect with any other widget. As illustrated here:
Window::Window(QWidget *parent)
    : QWidget(parent)
{
    setupUi(this);

    movieWidget = new MovieWidget(this);
    connect(this, SIGNAL(movieChosen(QString)),
            movieWidget, SLOT(loadMovie(QString)));
    connect(movieWidget, SIGNAL(optimalSizeChanged()),
            this, SLOT(updateSizes()));
    layout()->addWidget(movieWidget);
    ...
}
Since we are using QuickTime, we need to initialize the QuickTime environment. The typical place to do this is in the main() function:
int main(int argc, char **argv)
{
    QApplication app(argc, argv);
    EnterMovies();              // initialize QuickTime
    Window movieWindow;
    movieWindow.show();
    QMetaObject::invokeMethod(&movieWindow, "chooseMovie",
                              Qt::QueuedConnection);
    int ret = app.exec();
    ExitMovies();               // uninitialize QuickTime
    return ret;
}
The call to EnterMovies() initializes the QuickTime environment, while ExitMovies() does the necessary tear down.
Now we can watch movies like, for example, the "Qt 4 Dance" inside Qt.
Using HIWebView
Another popular view that developers may want to use is HIWebView. Of course, HIWebView could be considered "androgynous" since it is actually a Cocoa WebView that is then wrapped inside a Carbon API. This is the only Cocoa view that is available in Carbon and it entails a number of issues. One of them is that it can't really be composited with other widgets in the widget hierarchy (i.e., you can't put other views on top of it).
Also, the Cocoa view has what would be referred to in X11 as "southwest gravity" which means that it expands "up and to the right". This is all well and good, but the Carbon view that wraps it has "northwest gravity" which means that you will have some strange resizing behavior if you don't handle the laying out of the views. Using QLayout helps shield you from this problem.
Another thing to be aware of is that HIWebView functions just create the view, the majority of the heavy lifting must be done through the Cocoa class. So, depending on how advanced you want to be, you may need to take a look at Objective-C/Cocoa.
Despite these issues, creating and embedding an HIWebView is not that much different than the HIMovieView above. We'll take a look at creating the widget and setting a URL on it:
WebWidget::WebWidget(QWidget *parent)
    : QWidget(parent)
{
    HIViewRef webView;
    WebInitForCarbon();
    HIWebViewCreate(&webView);
    create(WId(webView));
}
This is similar to what we had to do with HIMovieView. We first call our WebInitForCarbon(), a WebKit function that initializes the various bits for using WebKit. We then call HIWebViewCreate() to create our HIWebView, we then pass it along to the QWidget::create() function. At that point we have successfully created an HIWebView.
The setUrl() function mixes the fun of C, C++, and Objective-C into one function! Setting a URL on the HIWebView requires us to convert our QUrl to a NSURL and tell the web view to load it.
void WebWidget::setUrl(const QUrl &url)
{
  if (!url.isValid())
      return;

    QString qurlString = url.toString();
    CFStringRef urlStr = CFStringCreateWithCharacters(0,
        reinterpret_cast<const UniChar *>(
            qurlStr.unicode()), qurlStr.size());
    CFURLRef urlRef = CFURLCreateWithString(0, urlStr, 0);

    WebView *cocoaView = HIWebViewGetWebView(
                         HIViewRef(winId()));
    NSURLRequest *request = [
        NSURLRequest requestWithURL:(NSURL *)urlRef];
    [[cocoaView mainFrame] loadRequest:request];

    CFRelease(urlStr);
    CFRelease(urlRef);
}
We accomplish our conversion by making a CFStringRef from the QString representation of the QUrl. We create a CFURLRef from this CFStringRef. We then use Apple's "toll-free bridging" concept (which boils down to the fact that the CFURLRef is interchangeable with a NSURL pointer) to create a NSURLRequest which we can then feed to the web view's rendering frame. We remove our references at the end of the function to keep things from leaking. Since we are mixing both Objective-C and C++ in the same source file, we save the file with a .mm extension to indicate that it is an Objective-C++ file. We also put it in the OBJECTIVE_SOURCES area of our .pro file (instead of the regular SOURCES section), as shown below.
HEADERS += webwidget.h window.h
FORMS += window.ui
SOURCES += main.cpp window.cpp
OBJECTIVE_SOURCES += webwidget.mm

LIBS += -framework WebKit
Finally, here's a screenshot of the above WebWidget.

As mentioned above, this is really just scratching the surface for HIWebView; if you want full functionality (like knowing when a web page has been downloaded, updating the address bar when a link is clicked, etc.), you need to work with delegates, listeners, and other Cocoa/Objective-C patterns. We'll leave that to other documentation projects.
Conclusion
With Qt 4.2, the process of embedding HIViews is fairly straightforward. We've seen that the basics of creating them are more or less the same for two of the more complex views out there. Hopefully, being able to embed HIViews will make development with Qt/Mac a bit more of a cosmopolitan experience.
The full source code for the examples in this article can be downloaded from the Qt Quarterly website.
| Copyright © 2007 Trolltech | Trademarks |