Low-Level Text Layouts
One of the hidden benefits of Qt 4's rich text framework is the control it gives developers over the low-level aspects of text layout. Although initially used to advertise Qt 4's plain text formatting abilities, the classes that perform much of the heavy lifting on behalf of QTextDocument can also be put to work on other tasks. In this article, we'll see how they can make our text layouts more interesting.
In many applications that present rich text to users, the high-level rich text facilities provided by QTextDocument are more than sufficient. We can import documents using an HTML-style markup language, create new documents from scratch by feeding in paragraphs, frames and tables using QTextCursor, and let the user edit documents using QTextEdit.
Setting Limits
Many of Qt's widgets are able to display rich text thanks to the use of QTextDocument, whether behind the scenes in QLabel or part of the public API, as in QGraphicsItem. Unlike QTextEdit, these widgets often need to display rich text in a confined area, but they will always be able to assume that their text will be nicely formatted within a rectangular area.
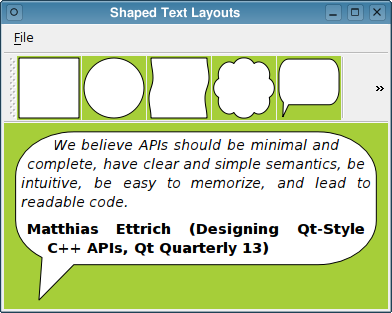
In some situations, it would be preferable to be able to present text within a non-rectangular area, such as inside a speech bubble, as in the image above. QTextDocument lets us provide our own implementation of QAbstractTextDocumentLayout to deal with situations like these. However, for simple display purposes, this is quite a lot of work. Since Qt's default implementation of QAbstractTextDocumentLayout uses QTextLayout to position text, we can cut out the middleman and use that directly.
Layouts and Lines
Each instance of QTextLayout is used to lay out a single paragraph of text in a document. Although its purpose seems simple enough, QTextLayout also provides features to deal with editing and cursor handling. In this article, we are concerned with its ability to perform line breaking. This activity takes the following form:
- We construct a QTextLayout object, passing the paragraph text and a font, and call its beginLayout() function to start the layout process.
- We call createLine() repeatedly to obtain QTextLine objects that we can use to arrange lines of text.
- When all lines have been laid out, we call endLayout() to indicate that we have finished.
- We call the line's setPosition() function to indicate where the line should go.
- We call the line's setLineWidth() function to let the line know how much space is available.
    layout = <span class="class"><span class="function">QTextLayout</span></span>(text, font, parent)
    layout.<span class="function">beginLayout</span>()
    y = 0
    line = layout.<span class="function">createLine</span>()

    <span class="keyword">while</span> line.<span class="function">isValid</span>():
        line.<span class="function">setPosition</span>(leftMargin, y)
        line.<span class="function">setLineWidth</span>(rightMargin - leftMargin)
        y += lineHeight
        line = layout.<span class="function">createLine</span>()
    layout.<span class="function">endLayout</span>()
With a basic understanding of the operation of QTextLayout, we can begin to think about arranging text within a shape.
Shaping Up
In the pseudo-code shown above, we didn't define how the margins or line height should be calculated. The line height can be based on the height of a default font, but the margin locations can be more challenging to calculate. In this article, they are determined from the shape we want to fit the text inside.
To place lines of text within a given shape, we must first consider how to represent it. QPainterPath objects are easy to create and can be converted into simpler representations quite easily, so we store our shapes using those.
Conceptually, finding the area in which we can place a line of text at a given vertical position is simply a matter of finding the points at which a horizontal line intersects with the path.
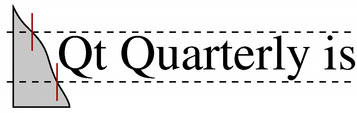
In practice, we will need two horizontal lines for each line of text, as shown in the diagram above, and we also need to find a way to determine where they intersect with the path. We'll return to this problem later on.
Putting It Together
We create a widget to explore our method, handling paint and resize events ourselves for full control over the text layout.
class TextWidget : public QWidget { Q_OBJECT public: TextWidget(QWidget *parent = 0); QSize sizeHint() const; void setParagraphs(const QStringList ¶s); public slots: void setShape(QPainterPath shape); protected: void paintEvent(QPaintEvent *event); void resizeEvent(QResizeEvent *event); private: void positionLayouts(); qreal shapeWidth, shapeHeight; qreal xScale, yScale; ... QPainterPath shape; QList<QTextLayout *> layouts; QStringList paragraphs; QList<QList<QTextLayout::FormatRange> > formats; };
In addition to the path containing the shape, the widget holds the raw text itself as a sequence of paragraphs in a QStringList, and a list of formats is kept for each paragraph.
Since we will also stretch the shape to fit the size of the widget, it helps to keep track of the scaling factors used as well as the shape's original size. This helps us to write the positionLayouts() function, which tries to fit each paragraph inside the scaled shape, generating a list of QTextLayout objects that describe the flow of text.
Implementing most functions in the class is straightforward. The constructor sets up some default attributes for the text; to save space, we only show the word wrapping and alignment options:
    TextWidget::TextWidget(QWidget *parent)
        : QWidget(parent)
    {
        shapeWidth = 320.0;
        shapeHeight = 320.0;
        ...
        option = QTextOption(Qt::AlignJustify);
        option.setWrapMode(QTextOption::WordWrap);
    }
Although no shape is used initially, a default shape size is also provided since this is used as the basis of the widget's size hint:
    QSize TextWidget::sizeHint() const
    {
        return QSize(int(shapeWidth), int(shapeHeight));
    }
The current shape is set with the setShape() function, in which we store the new shape supplied along with its dimensions---we assume that the coordinates used to define the QPainterPath all have positive values, resulting in a size that includes a border around the shape.
    void TextWidget::setShape(QPainterPath newShape)
    {
        shape = newShape;
        shapeWidth = newShape.boundingRect().right()
                   + newShape.boundingRect().left();
        shapeHeight = newShape.boundingRect().bottom()
                    + newShape.boundingRect().top();
        positionLayouts();
        update();
    }
Having obtained a new shape, the first task we perform is to call positionLayouts() to lay out the text in the widget. Then we can call update() to display the new layout to the user.
Similarly, when the widget is resized, we need to lay out the text again and update the widget.
    void TextWidget::resizeEvent(QResizeEvent *event)
    {
        positionLayouts();
        update();
    }
Before we look at the positionLayouts() function, let's take a look at how the widget is painted.
In the first part of the painting process, we fill the widget with a solid color and paint the scaled shape over it using a white brush and a black pen.
    void TextWidget::paintEvent(QPaintEvent *event)
    {
        QPainter painter;
        painter.begin(this);
        painter.setRenderHint(QPainter::Antialiasing);
        painter.fillRect(event->rect(), QColor("#a6ce39"));

        painter.save();
        painter.setPen(QPen(Qt::black));
        painter.setBrush(QBrush(Qt::white));
        painter.scale(xScale, yScale);
        painter.drawPath(shape);
        painter.restore();

        foreach (QTextLayout *layout, layouts)
            layout->draw(&painter, QPointF(0, 0));
        painter.end();
    }
In the second part of the painting process, we iterate over the layouts that have been prepared, asking each one to paint its contents.
Line by Line
The positionLayouts() function fills in the layouts list with QTextLayout objects that describe how each paragraph fits inside the shape. We'll only show the body of the function to save space.
We begin by establishing the default font and line height, and we calculate the scale factor used to resize the shape to fill the entire widget. We also convert the shape's painter path to a list of polygons to use when we try to fit lines within the available space.
    QFontMetricsF fm(font);
    qreal lineHeight = fm.height();

    xScale = width()/shapeWidth;
    yScale = height()/shapeHeight;
    QMatrix m(xScale, 0.0, 0.0, yScale, 0.0, 0.0);
    QList<QPolygonF> polygons = shape.toSubpathPolygons(m);

    qreal y = yScale * shape.boundingRect().top() + margin;
    qreal ymax = yScale * shape.boundingRect().bottom()
               - margin;
    qDeleteAll(layouts);
    layouts.clear();
The vertical position of the first line in the page, y, and the lowest position we can move to, ymax, are determined from the scale factor, shape and margin. We discard the existing text layout by deleting all current QTextLayout objects and clearing the layouts list.
We iterate over all paragraphs in the document, using a separate text layout for each of them. Each layout is constructed with the raw text and the default font, but we also supply a list of additional formats that influence the appearance of the text.
    for (int p = 0; p < paragraphs.size(); ++p) {

      QTextLayout *textLayout =
                  new QTextLayout(paragraphs[p], font);
      textLayout->setTextOption(option);
      textLayout->setAdditionalFormats(formats[p]);
      textLayout->beginLayout();
      QTextLine line = textLayout->createLine();
With a layout ready to use, we obtain our first QTextLine object and start the process of laying out the text.
As described earlier, we place horizontal lines above and below where we would like to place a line of text and test for intersections with the lines that make up each polygon, storing all x-coordinates where these occur.
    while (line.isValid()) {

        QLineF topLine = QLineF(xmin, y, xmax, y);
        QLineF bottomLine = topLine;
        bottomLine.translate(0, lineHeight);
        QVector<qreal> xCoords;

        foreach (QPolygonF polygon, polygons) {
            for (int i = 0; (i+1) < polygon.size(); ++i) {
                QLineF l = QLineF(polygon[i], polygon[i+1]);
                QPointF p;
                if (l.intersect(topLine, &p) ==
                    QLineF::BoundedIntersection)
                        xCoords.append(p.x());
                if (l.intersect(bottomLine, &p) ==
                    QLineF::BoundedIntersection)
                        xCoords.append(p.x());
            }
        }
If there is an a positive, even number of intersections, we sort the x-coordinates and use the innermost ones as horizontal margins for this line of text.
      if (xCoords.size() > 0 && (xCoords.size() % 2) == 0) {
          qSort(xCoords.begin(), xCoords.end());
          left = xCoords[xCoords.size()/2 - 1] + margin;
          right = xCoords[xCoords.size()/2] - margin;

          line.setPosition(QPointF(left, y));
          line.setLineWidth(right - left);
We can now set the position and width of the line using the margins and current value of y, and move downwards by one line height. If the text fits into the available horizontal space and didn't cross the bottom margin, we create a new line to work with.
        y += line.height();
          if (line.naturalTextWidth() <= (right - left)
              && y <= ymax)
                line = textLayout->createLine();
        } else
            y += lineHeight;
        if (y + lineHeight > ymax) break;
      }
If, for some reason, we couldn't even try to place text in a line, we continue moving downwards until there is no space left, breaking out of the line layout loop. At this point, we may still have an "active" line to deal with. Currently, the only way to discard it is to place it outside the visible widget area.
    if (line.isValid())
          line.setPosition(QPointF(xScale * shapeWidth,
                                   yScale * shapeHeight));
      textLayout->endLayout();
      layouts.append(textLayout);

      y += paragraphSkip;
      if (y + lineHeight > ymax) break;
    }
With the paragraph laid out, we call endLayout() and append the layout object to the layouts list, ready to be painted. Before laying out the next paragraph, we increase the y-coordinate to insert some extra space, or break out of the loop if we approach the bottom margin.
Filling in the Gaps
The missing setParagraphs() function needed to set up character formats is included in the example code, available here.
–û–±—Å—É–¥–∏—Ç—å...